From the notebook
How KYC selfie verification works: quality checks, face matching against the ID photo, and the decision
What happens when an app asks for a selfie with your ID: face detection, quality gates for size, blur and lighting, comparing face embeddings with the document photo, and turning a similarity score into match, review or retry. Tested Python for the quality gates and the decision, with the reasons a user sees.
KYC selfie verification compares a live photo of you with the photo on your ID document to confirm the document is yours. It runs in four steps: find the face in both images, check the selfie’s quality (face big enough, sharp, properly lit), turn each face into an embedding (a vector from a face-recognition model) and compare them with cosine similarity, then decide: match above the threshold, human review below it, or retry when quality is too poor to judge. A liveness check runs alongside, to make sure the selfie is a live person and not a photo. The quality gate matters more than it looks: asking for a better photo is cheaper than a wrong decision on a bad one. Tested Python for the gates and the decision is below.
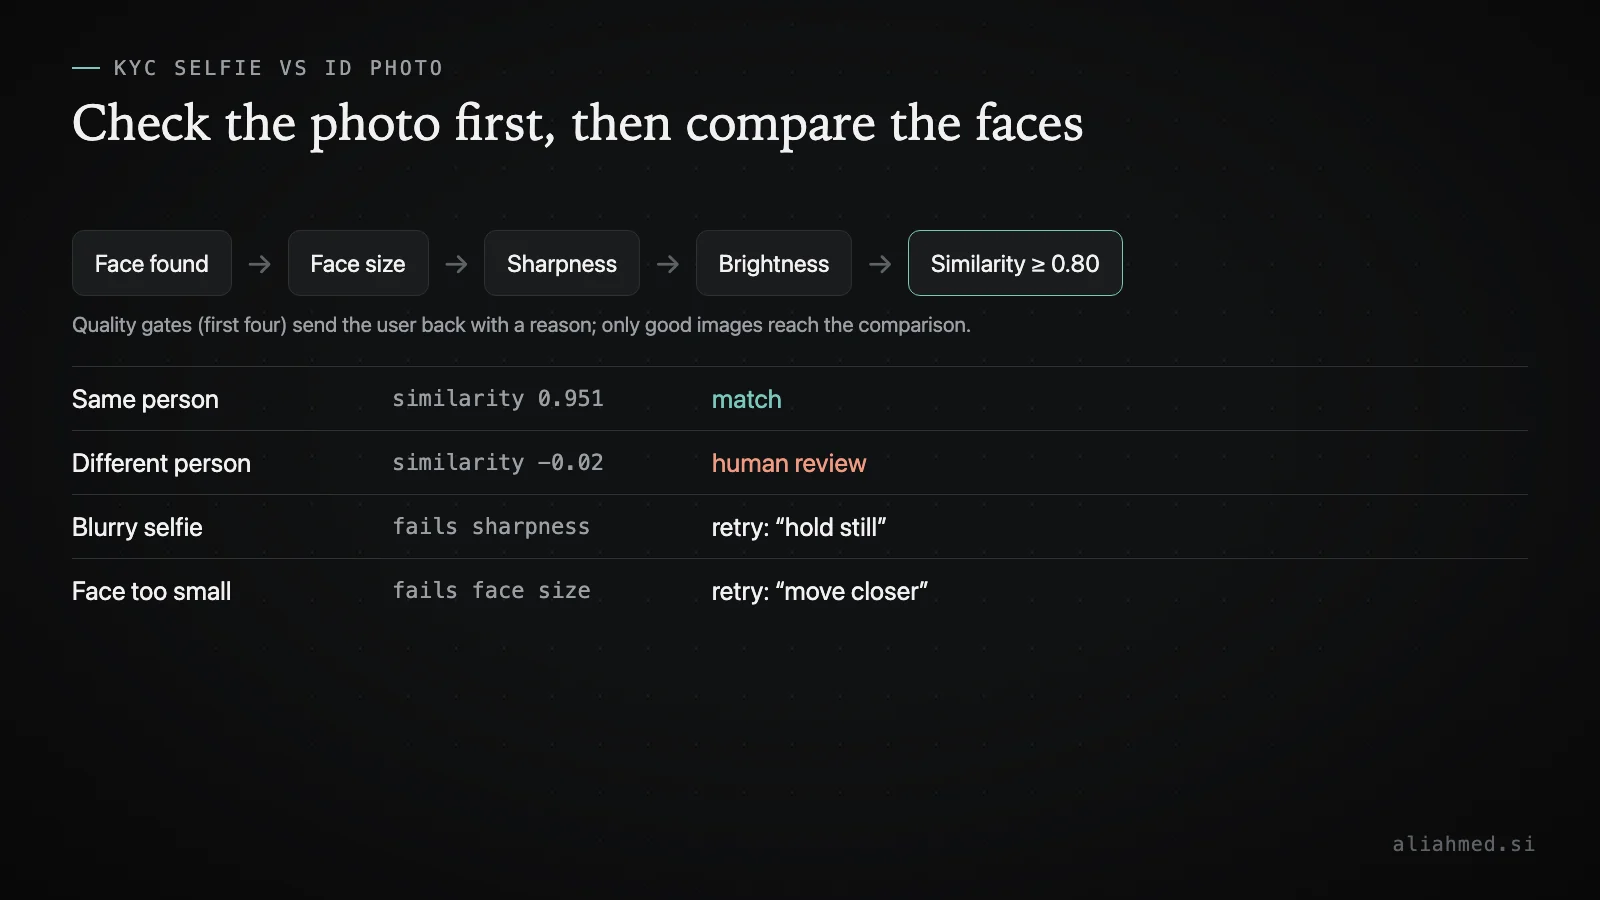
The decision flow tested below, with each outcome and the message a user would see.
Step 1: quality gates
A face recognition model will produce a score for any image, including a blurry, dark one where the face is a few pixels wide. Stopping those first, with a reason the user can act on, protects both accuracy and conversion:
import numpy as np

def sharpness(gray: np.ndarray) -> float:
    """Variance of the Laplacian: low means blurry."""
    g = gray.astype(float)
    lap = -4 * g[1:-1, 1:-1] + g[:-2, 1:-1] + g[2:, 1:-1] + g[1:-1, :-2] + g[1:-1, 2:]
    return float(lap.var())

def quality_problems(gray: np.ndarray, face_box: tuple[int, int, int, int] | None,
                     min_face_frac: float = 0.15, min_sharpness: float = 50.0, brightness=(60, 200)) -> list[str]:
    """Reasons to ask for a new selfie before matching. face_box = (x, y, w, h) from the face detector, or None."""
    if face_box is None:
        return ["no face found: centre your face in the frame"]
    problems = []
    h, w = gray.shape
    x, y, fw, fh = face_box
    if fw / w < min_face_frac:
        problems.append("face too small: move closer")
    face = gray[y:y + fh, x:x + fw]
    if sharpness(face) < min_sharpness:
        problems.append("image blurry: hold still")
    mean = float(face.mean())
    if mean < brightness[0]:
        problems.append("too dark: find more light")
    elif mean > brightness[1]:
        problems.append("overexposed: avoid direct light")
    return problems
The variance of the Laplacian is a cheap, standard blur measure: edges produce large second derivatives, and blur smooths them away. In the test, a textured in-focus image scored about 54,000, and the same image after a 9×9 blur scored 35. The exact threshold depends on your camera and resolution, so set it from real accepted and rejected selfies. The same checks apply to the document image; see preparing ID photos for OCR and, for phone photos, EXIF orientation.
Step 2: comparing faces
A face recognition model maps each face to a vector, often 512 numbers, so that photos of the same person land close together. Similarity is the cosine of the angle between them:
def cosine(a: np.ndarray, b: np.ndarray) -> float:
    return float(a @ b / (np.linalg.norm(a) * np.linalg.norm(b)))

def decide(gray, face_box, selfie_emb, document_emb, threshold=0.80) -> dict:
    problems = quality_problems(gray, face_box)
    if problems:
        return {"decision": "retry", "reasons": problems}
    score = cosine(selfie_emb, document_emb)
    if score >= threshold:
        return {"decision": "match", "score": round(score, 3)}
    return {"decision": "review", "score": round(score, 3), "reasons": [f"similarity {score:.2f} below {threshold}"]}
To keep the test self-contained, the embeddings are synthetic: a “same person” vector with noise added scores 0.951, and an unrelated one -0.02. A real model gives less tidy numbers, which is exactly why the threshold has to be chosen from measured false accepts and false rejects: see face match thresholds. The tests confirm each outcome: match, review for a different face, and retry with the right reason for a blurry image, a dark image, a face that’s too small, and no face at all.
Why three outcomes, not two?
- Retry is for images that can’t be judged. The user gets a specific instruction, and most succeed on the second try.
- Review is for faces that can be judged but don’t clearly match: age gaps, glasses, an old document photo. A reviewer sees both images and the score.
- Match only above a threshold set for your risk level, and only together with a passing liveness check.
Treating “low score” and “bad photo” as the same failure sends good customers to review, or worse, rejects them for a problem a better photo would fix.
Where the reference photo comes from
The document photo is printed, small and often years old. On an e-passport, the chip holds the issuer’s own digital photo, signed by the country, which is a better reference and can’t be swapped: see OCR vs NFC chip reading. Use it when the user can scan the chip.
Summary
- Selfie verification: find faces, gate on quality, compare embeddings with cosine similarity, decide.
- Use three outcomes: match, review, retry, each with a reason.
- Variance of the Laplacian is a simple blur check; tune it on real images.
- Pick the threshold from measured error rates, combine with liveness, and prefer the chip photo when available.
The full pipeline is in how KYC identity verification works.
Part of the guide KYC and identity verification engineering, which puts related articles in reading order.